
| Key | Value |
|---|---|
| Summary | Learn how to use GitLab as a private container registry for Kubernetes |
| Categories | deploy-applications |
| Difficulty | 3 |
| Author | Peter De Sousa peter.de.sousa@canonical.com |
Overview
Container orchestration solutions such as Kubernetes allow development teams to be quick and agile with their software deployments. The main feature of these orchestration tools is the ability to reduce the deployment of a version piece of software down to a simple tag name on the end of a string. For example image: someApplication:canary.
This opens the doors to streamlined deployments, but creates another problem. How do we streamline? We can do this manually, but it’s not very streamlined. Or we can do this automatically, but we need to be smart. We can’t just deploy as soon as a new version is released. We need to check it first. This is where container registries and CI/CD come in.
GitLab can store up to 10 GB in a container registry for projects. You can incorporate the building of these containers into your own CI/CD pipeline or you can use Gitlab’s own CI/CD functionality to do this for you. For this tutorial, you will do this by hand so you can get a grasp of the process.
In this tutorial you’ll learn how to:
- Create a private container registry on GitLab
- Create deployment keys
- Create a container
- Push to the container registry
- Pull using your deployment key
You will only need
- Kubernetes cluster
Find yourself a healthy Kubernetes cluster. If you don’t have access to one, install MicroK8s on your laptop at no cost. If you’re on Windows or Mac, you may need to follow the Multipass guide first to get a VM with Ubuntu before you start.

Process
Duration: 1:00
To create your container registry on GitLab you will need to complete the following steps:
- Create a project
- Add a Dockerfile
- Enable Container Registry
- Build your image
- Push your image
- Create a token
- Pull your image
These steps will create a private registry, but you can use them as a guide for a public registry also—just skip the deployment token steps.
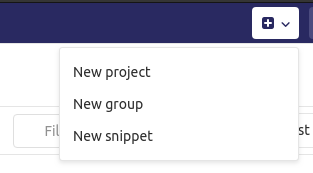
Choose or create a project
Duration: 2:00
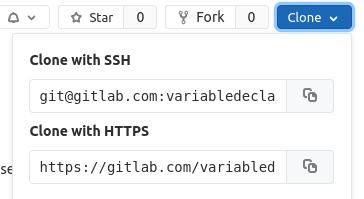
To begin with, you can use an existing project or create a new one. For the purposes of experimentation, it’s best to create a private project. Below I will create a new private project called gitlabregistries.
Now, grab the git repository address and clone the repository to a directory of your choice.
Create the Dockerfile
Duration: 4:00
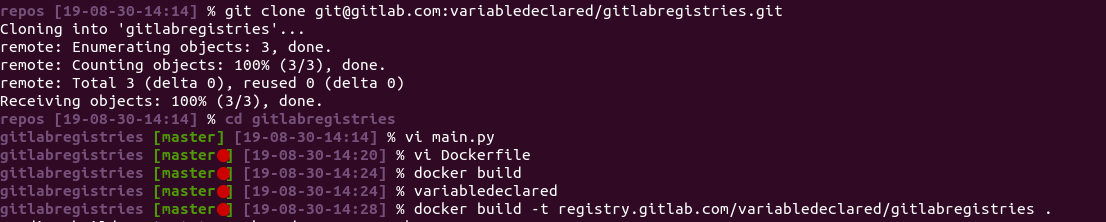
First, get a terminal inside of the newly cloned directory.
To set up our shell project, you are going to do two things: create the Dockerfile and add a small program to show that our image has deployed to Kubernetes.
Let’s start with the program. In your terminal, use your favorite editor (below, vi) to open a new file, main.py:
vi main.py
Add these lines to the new file:
import time


def main():
    while True:
        print("Ubuntu runs containers!")
        time.sleep(5)


if __name__ == "__main__":
    main()
Now that that is done, you can move on to the Dockerfile:
vi Dockerfile
Add these lines:
FROM ubuntu:latest
RUN apt-get update && apt-get -y install python3
COPY ./ /opt/vb
CMD ["python3", "/opt/vb/main.py"]
You can now build your container but, before this, you need to enable container registries on Gitlab and grab the URL. Below is a screenshot of an already enabled projected, but you can find these settings by navigating to Settings > General > Visibility, project features, permissions and then pressing the expand button.

Build your container
Duration: 5:00
To build your container, execute the command below:
docker build -t registry.gitlab.com/<YOUR_USERNAME>/gitlabregistries .
Before you can push to the repository, you need to log in to Docker:
docker login registry.gitlab.com -u <USERNAME>
If the login was successful, you should see a message similar to this :

Push your container
Duration: 5:00
We can then push to your project’s repository:
docker push registry.gitlab.com/<YOUR_USERNAME>/gitlabregistries
Pull your container
Duration: 10:00
Create a token
Before you can pull from the private repository, in order for the pulling to go through, you need to create a secret for Kubernetes.
According to the Kubernetes documentation, you can create a new secret by executing the following with your username (below, k8s) and token:
kubectl create secret docker-registry regcred --docker-server=registry.gitlab.com --docker-username=k8s --docker-password=<token>
To check, run kubectl get secret regcred -o yaml. Mine looks as below:
    apiVersion: v1
    data:
      .dockerconfigjson: <base64 encoded token>
    kind: Secret
    metadata:
      creationTimestamp: "2019-08-30T13:55:11Z"
      name: regcred
      namespace: default
      resourceVersion: "19552"
      selfLink: /api/v1/namespaces/default/secrets/regcred
      uid: be61c809-1572-431f-8a73-43c80e934923
    type: kubernetes.io/dockerconfigjson
Now you can use your newly uploaded container image to create a deployment :
kubectl create deployment gitlabrepositories --image=registry.gitlab.com/<YOUR_USERNAME>/gitlabregistries
You’ll need wait for it to come up:
watch kubectl get pods
Initially, Kubernetes will fail to pull the image, and you should see something like this:
gitlabrepositories-86d4b9bf87-q86rx 0/1 ImagePullBackOff 0 3m39s
This is because there’s no secret. To add it, you need to edit the deployment:
kubectl edit deployment gitlabrepositories
Under the containers spec, add imagePullSecrets as follows:
         spec:
           containers:
           - image: registry.gitlab.com/variabledeclared/gitlabregistries
             imagePullPolicy: Always
             name: gitlabregistries
             resources: {}
             terminationMessagePath: /dev/termination-log
             terminationMessagePolicy: File
           dnsPolicy: ClusterFirst
           imagePullSecrets:
           - name: regcred
Check the pods again; now, your container should have started.
If your pod has started, then let’s check the logs for logging.
kubectl logs -f <YOUR_POD_NAME>
There seems to be a problem:
Looks like we forgot something! But that’s fine because by now our process setups is already (semi) automatic. Let’s go into the Dockerfile and add this line just before CMD:
ENV PYTHONUNBUFFERED=1
Rebuild:
docker build -t registry.gitlab.com/<YOUR_USERNAME>/gitlabregistries:v1 .
Push:
docker push registry.gitlab.com/variabledeclared/gitlabregistries:v1
And update the deployment with the new image tag:
       spec:
           containers:
           - image: registry.gitlab.com/variabledeclared/gitlabregistries:v1
             imagePullPolicy: Always
             name: gitlabregistries
             resources: {}
             terminationMessagePath: /dev/termination-log
             terminationMessagePolicy: File
           dnsPolicy: ClusterFirst
           imagePullSecrets:
           - name: regcred
           restartPolicy: Always
           schedulerName: default-scheduler
           securityContext: {}
          terminationGracePeriodSeconds: 30
OK, let’s check the logs now:

Voila!
That’s all, folks!
Duration: 1:00
In this tutorial, you learnt how to use GitLab as a container repository, albeit with some human labour involved. You can check out GitLab’s documentation on how to take your newly learned skills and apply them to your own CI/CD or create one in GitLab.
If you don’t wish to use a private repository, then you can use these steps as a guide, ignoring the generate token steps.